Speed Up Very Slow Computer Shutdown

Speed Up Very Slow Computer Shutdown

Are you tired of waiting for the comptuter to turn off? Very slow computer shutdown is not an uncommon problem. But, it can be easily rectified with just a few easy steps. There are literally dozens of programs and processes that need to close before Windows can finalize it major shutdown operations.


However, rest assured your shutdown is not nearly as complex as a startup. One of the major reasons that your PC has a very slow computer shutdown is due to lack of maintenance. If you are in a hurry you can easily speed up a very slow computer shutdown by using a registry cleaner.
Tips to speed up very slow computer shutdown

Tip #1: Cut down of the programs and processes running in the background.--When you start your computer many unnecessary processes are loaded. You can eliminate this by managing your msconfig. 


Here is how:

1. Press Windows+R.

2. In the command screen type "msconfig.exe"

3. In the system configuration utility,click either service or startup tab.

4. Uncheck all programs that your are no longer want to run in the background.

5. Click OK

For a list of programs that you don't need and tips on speed up your startup


Tip #2: Clean your Registry- Usually slow computer shutdown often occurs due to a corrupted registry. You should perform a Scan Of Your Registry I will recommend CCleaner click to download CCleaner. If you receive more than 30 errors, this is the reason why you have slowdown.


Tip #4: Alter your Paging File Settings-- The paging file (Pagefile.sys) is a hidden file on your computer's hard disk that Windows uses as if it were random access memory (RAM). Therefore this file can be huge. On shutdown it must be cleared. This can cause very slow computer shutdown. We can avoid this by instructing our computer to not close this file during shutdown.Warning this a a dangerous tip because you to edit your manually registry. This can cause serious damage. A registry cleaner may be able to perform this function for you 
Here is how:


1. Press Windows+R

2. Type regedit.exe

3. Find the folder: HKEY_LOCAL_MACHINESystemCurrentControlSetControlSession ManagerMemory

4. At this point you will see a list of files, Double click on Clear Page File At Shutdown

5. Change the value of the paging file to "0"

Tip #5: Check Your Device Drivers--When your computer shutdown, the operating system must disengage from all your hardware devices. This action allows the devices to power off. If the device has error or cannot be find the device, Windows will have a very slow shutdown or even hang forever. Updating the driver or troubleshooting it may eliminate this problem.Check your device drivers for any errors which are indicated by an yellow exclamation mark or an X. Following the below instructions to evaluate the driver


1.Click “Control Panel
2.Click Device Manager to bring up a full list of installed hardware drivers.

3.Right click and choose “Properties” to evaluate the status and troubleshoot the hardware device.

At this point, you can either delete the driver or update it. If you choose to delete the driver, when you restart your computer, Windows will search for a driver to replace it. It may replace it with a more suitable driver or request that you download a new one. 
Buy Now Shutting Down your PC shouldn't be taking much of your time.


How To Turn Your PC To An Hotspot (Windows 10) Only

Share a Wired or Wireless Internet Connection in Windows 10
With Windows 10 Anniversary Update on your PC, You can just turn any PC with Wi-Fi into a hotspot, and that doesn’t mean the Internet connection you want to share has to be wired or wireless. If you are using Windows 7 click here
First:
Press Windows+I on your keyboard. On the Windows Settings page, click “Network & Internet.”

On the Network & Internet page, on the left-hand side, click “Mobile hotspot.”


On the right-hand side, turn on the “Share my Internet connection with other devices” switch. If you want something other than the default network name and password, click the “Edit” button.

In the Edit window, type the network name and password you want to use and then click “OK.”
That's all you have to do in Windows 10. 

Recover Hidden Files

Recover Files Hidden By Virus in your USB Drive
Virus can hide files in your Flash or Pendrive and Turn them to Shortcut,
This is caused by a virus called “Shortcut Virus”
Below are Steps to Recover your files


Step 1:
Attach Your Flash-Drive to your Computer

Step 2: 


Click on the below link and download the file "Smadav"

http://www.filefactory.com/file/6h7evnqocd7b/smadav1104.exe

Follow the Instructions and Install


Step 3:

Goto file explorer Right click on your flash drive and choose “Scan With Smadav”  
Click on “Fix all” this will open up another Windows File Explorer with a folder without Name

Another Method is Using Command Prompt 

Hold the "Window +R key " type cmd and click on OK.

Here I assume your pen drive letter as G:

Enter this command.

attrib -h -r -s /s /d g:\*.*

You can copy the above command 


Right-click in the Command Prompt and paste it.

Note : Don't forget to replace the letter g with your pen drive letter.

Now press "Enter".

Now check for your files in Pen Drive.

Step 3:

After that, download the Malwarebytes' Anti-Malware from the below link

https://downloads.malwarebytes.com/file/mbam_current/

Update it --> Perform "Full Scan"

Note : Default selected option is "Quick Scan".

Good Luck.

Print a message


 How to Print a Text Message Conversation
Sometimes a text message conversation is so important that you might need a paper copy to keep in a safe place. Here’s how to print out text message conversations so that you’ll always have a physical copy available in case of emergency.
In case you have a text message conversation with someone that’s very important, it’s always a good idea to keep a backup of it so that you’ll have it on record whenever you need it. Even if you back up these text messages to your computer, it’s always a good idea to keep them backed up somewhere else as well.
With that said, having a physical, printed-out copy of an important text message conversation is great to have. Let say you where texting someone about something that could prove useful in court during a hearing, or you just want to save the last text messages you received from a friend who passed away–it’s never a bad idea to print them out and keep them safe somewhere.
Using  Google Cloud Print
If you have a printer that supports  Google Cloud Print on Android devices, then you can print out your text message conversations right from your device. If you’re not sure if your printer supports this features check here .

Using Google Cloud Print, you can print directly from your Android device to your printer if it supports Google Cloud Print, but there’s a bit more to do to get it working. This guidedoes a good job of explaining your options if you’re on Android.

In a nutshell, you’ll need the Cloud Print app installed on your phone if it isn’t already. More than likely, though, it’s already installed by default and comes stock with your device, but if not, simply download it from the Google Play Store.
After that, there are several ways you can print from your device, either by saving it to a .PDF file to Google Drive and then printing it out, using a brand-specific app for your printer from HP, Epson, etc., or printing directly to your printer if it’s connected to your home network.

Printing the Old-Fashioned Way
If you have basic printer that doesn’t support Google Cloud Print, then you’ll need to perform a couple of extra steps.
You’ll still need to screenshot the text message conversation, only this time you’ll also need to send those screenshots to your computer. There are a lot of different ways you can do that.
One method that works on  Android is to simply email the screenshots to yourself. In Android, you can do this by selecting the screenshots in your photos app and hitting the share button. From there, select Gmail and send the screenshots to your own email address. You could also save them to your Dropbox, Google Drive, or other cloud service and access them from your computer.


Once these screenshots are on your computer, you can print them out like you would with any other document. Personally, I like to open up photos in Photoshop or some other editing software and fine-tune the printing settings for the images, you can simply just send the photos to print without any preparation and they should print out just fine.

How to shutdown a windows pc

Shut Down a Windows PC Without Installing Updates

One of the most frustrating things that can happen to you when you are using your Laptop and you are in a haste to go. Then you decide to shut down your laptop, but Windows insists on updating. Twelve minutes later, you’re still waiting for Windows to update and you’re going to be late.
There is a way around this: a way to can shut down immediately even when there are updates waiting to install.

Here’s the simplest method: make sure the desktop has focus by clicking any empty area of the desktop or pressing Windows+D on your keyboard. Then, press Alt+F4 to access the Shut Down Windows dialog box. To shut down without installing updates, select “Shut down” from the drop-down list.

Then, click “OK” to shut down your PC immediately.

You can also shut down your PC immediately from the login screen. Press Windows+L to lock the screen, or log out. Then, in the lower-right corner of the login screen, click the power button and select “Shut down” from the popup menu. The PC will shut down without installing updates.

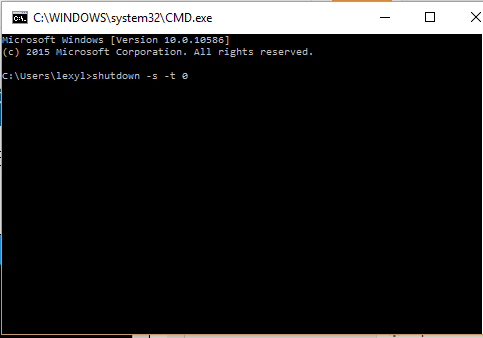
Lastly, if you need do do this from a script, you run the following shutdown command in a Command Prompt window. Type the following command at the prompt and press Enter. The last character is a zero.
shutdown -s -t 0
Your PC will shut down immediately without installing updates.